Orbitron DDE Azimuth Elevation To Serial

Control a satellite rotator automatically from Orbitron by sending it the azimuth (or other properties) via serial.

A while ago I wrote some code to listen to Orbitron using it’s DDE inter-process comms and send the satellite information string over serial to potentially drive an aerial rotator.

I’ve since updated the code and thought I would share it here.

Using DdeOrbitronToSerial

  • Firstly install Orbitron.
    • Update 13-02-2019: Orbitron doesn’t seem to work well unless you run it as admin – it can’t save files to its install dir and won’t pick up config changes. One work-around may be a custom install location.
  • Download DDEOrbitronToSerial.zip (June-2019) and unzip it to somewhere sensible.
  • Open the install directory of Orbitron and find Setup.cfg (example path below)
    • C:\Program Files (x86)\Orbitron\Config\Setup.cfg
  • Add a similar line as below to Setup.cfg: (obviously changing paths to where you unzipped things) As per Orbitron’s documentation:

    List of available drivers. New drivers can be added by editing [Drivers] section of Config\Setup.cfg file. Example config line: MyDriver=d:\MyDriver.exe

[Drivers]
DDEOrbitronToSerial=C:\blah\DDEOrbitronToSerial.exe
  • Don’t directly run the exe, you have to launch it from Orbtron itself by going to the rotor/radio tab, selecting the correct DDE driver, in this case it’s DDEOrbitronToSerial. Then click the button to the right of the dropdown to start sending data and launch the application:

orbtron-rotor-tab

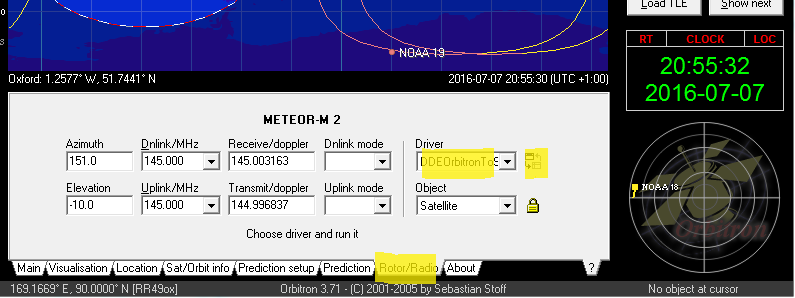
  • The DDEOrbitronToSerial application should now launch and you will be able to select your COM port and output the satellite data to the serial port.
    • NB: You can edit additional options such as com port baud rate in the config file by clicking the open config button.

Any bug reports or feature requests are welcome!

Updates

  • June 2019 – Added latest release with a bug fix:
    • FIXED: Certain USB to serial chips would only receive a few characters.

Rotate a point around another point code

If you need to rotate a point around another point in 2D then here is a nice function. The below is in C#.

/// <summary>
/// Rotates 'p1' about 'p2' by 'angle' degrees clockwise.
/// </summary>
/// <param name="p1">Point to be rotated</param>
/// <param name="p2">Point to rotate around</param>
/// <param name="angle">Angle in degrees to rotate clockwise</param>
/// <returns>The rotated point</returns>
public Point RotatePoint(Point p1, Point p2, double angle) {

    double radians = ConvertToRadians(angle);
    double sin = Math.Sin(radians);
    double cos = Math.Cos(radians);

    // Translate point back to origin
    p1.X -= p2.X;
    p1.Y -= p2.Y;

    // Rotate point
    double xnew = p1.X * cos - p1.Y * sin;
    double ynew = p1.X * sin + p1.Y * cos;
    
    // Translate point back
    Point newPoint = new Point((int)xnew + p2.X, (int)ynew + p2.Y);
    return newPoint;
 }

 public double ConvertToRadians(double angle) {
     return (Math.PI / 180) * angle;
 }

Enjoy 🙂

TreeView context menus

Recently I wanted to add a right click context menu to a list of items in a TreeView control in C# and winforms.

It was relatively simple but there is one small thing that isn’t as obvious. That is that it is good to allow users to be able to right click an item and open it, delete it, run it or whatever you action is on the your context menu, without having to left click select it first. Less clicks == good.

So first create your TreeView, you can do this by dragging the control onto your form or custom control.

Now add a ContextMenuStrip item from the toolbox in the same way.

Go to the properties of the TreeView and set the ContextMenuStrip property to be the one which you just created.

Now add items to your context menu by click the small arrow drop down at the top right corner of it, see the image below:

contextMenuAddItems

You will then be able to click Edit Items:

contextMenuAddItems2

From you can add menu items, so add the ones you want and name them appropriately and change the menu text for them as well.

Now for the right clicking to actually work without a user selecting the item first we need to add this line of code somewhere sensible, i’ve put mine just after the InitializeComponent(); line in the form.

yourTreeView.NodeMouseClick += (sender, args) => yourTreeView.SelectedNode = args.Node;

This line of code means that the node you right click on will be selected as you right click, this is very important as in most cases you will want the actions in the context menu to be applicable to the item you have right clicked.

So now if you click your ContextMenuStrip control that you added your items to you should see your menu at the top of the form (while in design mode the context menu is just at the top of the form). Double click one of your items to add some functionaility.

One of my right click menu items is called openFile the click handler is below, this is where it is important to be able to have your SelectedNode set to the one you right clicked on.

// Code executed when a context menu item is clicked
private void openFile_Click(object sender, EventArgs e) {
    
    // Here we can now reference yourTreeView.SelectedNode
    DoSomething(yourTreeView.SelectedNode.Text);
}


If we did not have that first line of code ( the NodeMouseClick event handler ) the above code would throw an exception as the SelectedNode would be null (unless the user did a left click first).

Happy right clicking!