Perform Clean Install of Windows 10 on Dell Inspiron Gaming 7000 7577

Dell laptops are no where near as full of bloatware from the manufacturer as some others but they still do come with a lot of rubbish to get rid of. The cleanest and simplest thing to do if you buy one is to just format the machine and reinstall Windows 10.

The problem is there’s no install media provided.

First off, some things you should note:

  • Most models come with an M.2 SSD drive which requires drivers during a Windows install.
  • You won’t require your Windows 10 key from the old install. It is no longer on a label stuck to the machine unfortunately, it is stored in one of the chips on the motherboard. The installer will pick up the key automatically.

Steps

  1. Download and run the official Windows 10 tool https://www.microsoft.com/en-us/software-download/windows10 to create a bootable USB stick.
  2. The above tool will take some time. Once it has finished you will need to download the Intel drivers for the SSD else you won’t be able to get the SSD drive listed during the Windows 10 install. Get the SSD drivers named f6flpy-x64.zip (64-bit Operating System) here:  https://downloadcenter.intel.com/download/27147/Intel-Rapid-Storage-Technology-Intel-RST-?v=t
  3. Unzip the intel drivers into a directory on your USB memory stick.
  4. Restart the laptop and press the F12 key during boot to get to the boot menu.
  5. Select your USB stick to boot from and follow the instructions.
  6. When it comes to selecting a hard drive to install Windows onto, make sure to click the CD icon and navigate to your driver directory on the USB stick and install the SSD drivers.
  7. Delete all the partitions on both HDD and SSD.
  8. Create a new partition on the SSD and go ahead and install Windows as normal.
  9. Once Windows is installed you’ll also want to use disk management to setup the HDD and then you’ll be good to go.
XML to JSON python script (Also JSON to XML)

Here are 2 python scripts which convert XML to JSON and JSON to XML.

XML to JSON

Create the sample XML file, with the below contents.

sample.xml
<planets>
	<planet>
		<name>
			Earth
		</name>
		<radius>
			6,371km
		</radius>
	</planet>
	<planet>
		<name>
			Jupiter
		</name>
		<radius>
			69,911km
		</radius>
	</planet>
	<planet>
		<name>
			Mars
		</name>
		<radius>
			3,390km
		</radius>
	</planet>
</planets>

Run the below python script and and it will output the converted XML as a file named output.json.

import json
import xmltodict

with open("sample.xml", 'r') as f:
	xmlString = f.read()

print("XML input (sample.xml):")
print(xmlString)
	
jsonString = json.dumps(xmltodict.parse(xmlString), indent=4)

print("\nJSON output(output.json):")
print(jsonString)

with open("output.json", 'w') as f:
	f.write(jsonString)

JSON to XML

Create the sample JSON file, with the below contents.

sample.json
{
    "planets": {
        "planet": [
            {
                "name": "Earth",
                "radius": "6,371km"
            },
            {
                "name": "Jupiter",
                "radius": "69,911km"
            },
            {
                "name": "Mars",
                "radius": "3,390km"
            }
        ]
    }
}

Run the below python script and and it will output the converted JSON as a file named output.xml.

import json
import xmltodict

with open('sample.json', 'r') as f:
	jsonString = f.read()

print('JSON input (sample.json):')
print(jsonString)

xmlString = xmltodict.unparse(json.loads(jsonString), pretty=True)

print('\nXML output(output.xml):')
print(xmlString)

with open('output.xml', 'w') as f:
	f.write(xmlString)

You may need to install the xmltodict module:

pip install xmltodict

Minecraft won’t launch with error code 5

If you launch Minecraft and get an error as above, along the lines of cannot copy file error code 5 then you can potentially fix this by renaming a file as below.


Rename

C:\Program Files (x86)\Minecraft\tmpLauncher.tmp

to

C:\Program Files (x86)\Minecraft\minecraft.exe

Then just run the minecraft.exe file and it should start to download the runtime and then start up. Worked for me 🙂

Orbitron DDE Azimuth Elevation To Serial

Control a satellite rotator automatically from Orbitron by sending it the azimuth (or other properties) via serial.

A while ago I wrote some code to listen to Orbitron using it’s DDE inter-process comms and send the satellite information string over serial to potentially drive an aerial rotator.

I’ve since updated the code and thought I would share it here.

Using DdeOrbitronToSerial

  • Firstly install Orbitron.
    • Update 13-02-2019: Orbitron doesn’t seem to work well unless you run it as admin – it can’t save files to its install dir and won’t pick up config changes. One work-around may be a custom install location.
  • Download DDEOrbitronToSerial.zip (June-2019) and unzip it to somewhere sensible.
  • Open the install directory of Orbitron and find Setup.cfg (example path below)
    • C:\Program Files (x86)\Orbitron\Config\Setup.cfg
  • Add a similar line as below to Setup.cfg: (obviously changing paths to where you unzipped things) As per Orbitron’s documentation:

    List of available drivers. New drivers can be added by editing [Drivers] section of Config\Setup.cfg file. Example config line: MyDriver=d:\MyDriver.exe

[Drivers]
DDEOrbitronToSerial=C:\blah\DDEOrbitronToSerial.exe
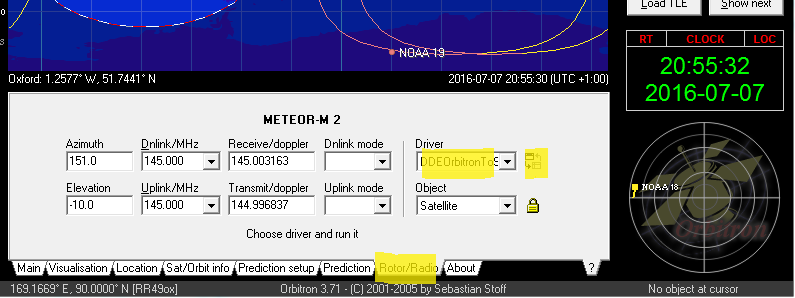
  • Don’t directly run the exe, you have to launch it from Orbtron itself by going to the rotor/radio tab, selecting the correct DDE driver, in this case it’s DDEOrbitronToSerial. Then click the button to the right of the dropdown to start sending data and launch the application:

orbtron-rotor-tab

  • The DDEOrbitronToSerial application should now launch and you will be able to select your COM port and output the satellite data to the serial port.
    • NB: You can edit additional options such as com port baud rate in the config file by clicking the open config button.

Any bug reports or feature requests are welcome!

Updates

  • June 2019 – Added latest release with a bug fix:
    • FIXED: Certain USB to serial chips would only receive a few characters.