I’m going to have a go at Laravel and see what it is like, my web dev is somewhat lacking so hopefully this will give me the structure I need for larger more complex sites.
I removed the link the outdated videos here and replaced it with the one above.
Recently I wanted to add a right click context menu to a list of items in a TreeView control in C# and winforms.
It was relatively simple but there is one small thing that isn’t as obvious. That is that it is good to allow users to be able to right click an item and open it, delete it, run it or whatever you action is on the your context menu, without having to left click select it first. Less clicks == good.
So first create your TreeView, you can do this by dragging the control onto your form or custom control.
Now add a ContextMenuStrip item from the toolbox in the same way.
Go to the properties of the TreeView and set the ContextMenuStrip property to be the one which you just created.
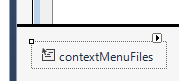
Now add items to your context menu by click the small arrow drop down at the top right corner of it, see the image below:
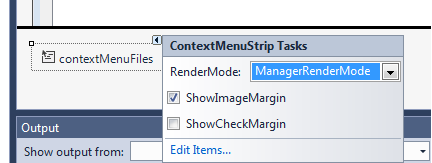
You will then be able to click Edit Items:
From you can add menu items, so add the ones you want and name them appropriately and change the menu text for them as well.
Now for the right clicking to actually work without a user selecting the item first we need to add this line of code somewhere sensible, i’ve put mine just after the InitializeComponent(); line in the form.
This line of code means that the node you right click on will be selected as you right click, this is very important as in most cases you will want the actions in the context menu to be applicable to the item you have right clicked.
So now if you click your ContextMenuStrip control that you added your items to you should see your menu at the top of the form (while in design mode the context menu is just at the top of the form). Double click one of your items to add some functionaility.
One of my right click menu items is called openFile the click handler is below, this is where it is important to be able to have your SelectedNode set to the one you right clicked on.
// Code executed when a context menu item is clicked
private void openFile_Click(object sender, EventArgs e) {

    // Here we can now reference yourTreeView.SelectedNode
    DoSomething(yourTreeView.SelectedNode.Text);
}
If we did not have that first line of code ( the NodeMouseClick event handler ) the above code would throw an exception as the SelectedNode would be null (unless the user did a left click first).
I wanted a page that would list all my posts, a site index basically. I tried a simple method and it was close but not what I wanted, it did not dynamically put the list of posts inside the content area of a page, so it looked very odd.
So here is a way to get your “All Posts” looking how it should on your WordPress site.
Make sure you are using a child theme on your WordPress site.
( You don’t have to do this but if you don’t use a child theme then when you update your theme then anything you do next will just be overwritten )
Step 2 Page Template
Create a page template. To do this create a php file in your active theme directory, mine is here:
“…/wp-content/themes/twentyfifteen-child/AllPostTemplate.php”
Now paste in the below code into your AllPostTemplate.php file and save it.
<?php
/*
Template Name: All posts
*/
get_header(); ?>
 <div id="primary" class="content-area">
 <main id="main" class="site-main" role="main">

 <?php
 // Include the page content template.
 get_template_part( 'content', 'page' );

 $first = 0; //The first article to be displayed
 while(have_posts()) : the_post();
 ?>
<script>
 var x = document.getElementsByClassName("entry-content");
 if (x[0] != null) {
 x[0].innerHTML = "<ul> <?php $myposts = get_posts('numberposts=-1&offset=$first'); foreach($myposts as $post) : ?><li><?php the_time('d/m/Y') ?>: <a href='<?php the_permalink(); ?>'><?php the_title(); ?></a> </li><?php endforeach; ?></ul> <?php endwhile; ?>";
 }
</script>

 </main><!-- .site-main -->
 </div><!-- .content-area -->

<?php get_footer(); ?>
Step 3 Create Page
Now we need to actually create the all posts page, this is very simple and is done through the WordPress dashboard.
Go to pages, then create a new page and change the Page Template from default (or whatever else it is) to be “All posts”.
All done!
NB: This template has only been tested with the TwentyFifteen Theme, it should work for most though.
As I’ve recently done this myself and it wasn’t as straight forward as wordpress say it is here are a few things which may be of use to someone.
I’m assuming that:
You want to move your wordpress site ‘olddomain.com’ to ‘newdomain.com’
Both ‘olddomain.com’ and ‘newdomain.com’ are hosted together.
That the ‘newdomain.com’ can access the database that ‘olddomain.com’ was using.
Step 1
Backup your site (Database and files)
Step 2
Copy all your files from your ‘olddomain.com’ directory to your ‘newdomain.com’ directory
Step 3
Go to your settings->general section of your new wordpress site e.g ‘newdomain.com/wp-admin/options-general.php’
Update both the fields for ‘WordPress Address’ and ‘Site Address’ to be ‘http://newdomain.com’
Step 4
By now your site will almost be working but some images and other media will not be working.
We need to change values in the database to stop them pointing to ‘olddomain.com’ for images as once you delete your old site files they will obvisouly not be accessible. You can do this manually or use this plugin I found that works well.
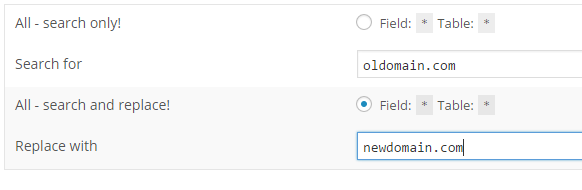
Go to your Plugins section and install the plugin: ‘Search & Replace’ the summary is: “A simple search to find strings in your database and replace those strings.”
Now go to tools and select ‘Search & Replace’ and select ‘Search and replace’ and enter your old domain in the ‘search for’ and your new domain in the ‘replace with’:
I’ve been using the Arduino Mega 2560 recently for my robotics project and after getting a fair way through some code I found that I started to receive this error:
relocation truncated to fit: R_AVR_13_PCREL
It turns out there is a bug in the arduino IDE or at least the compiler it uses. The solution was to Download the Beta Arduino IDE which has the bug fixed in it.
That fixed it for me. Happy tinkering.
For anyone that is interested: I think that the bug was due to a compiler flag or config error which disabled the option for the compiler to use long jumps. So as your code grows you gradually fill more memory and the device cannot use its short (more efficient) jump instructions to move around memory as you have now used more than 4kB which I believe is the limit of the short jump instruction on those chips.
This may be old news (about a month old) but I had not heard about it until a friend pointed it out to me.
It looks like Microsoft will, after some mentions of it in early 2014, be ‘open source-ing’ .Net and making official builds of the runtime for Linux and OSX. In my opinion this is great news. .Net (C# in particular) has been by far the most productive language I have ever used; .Net has an abundance of officially supported libraries that make your coding life so much better.
Hopefully the guys over at Mono will be hired to oversee the porting of the official builds as they’ve done a great job so far of creating unofficial ports to other OSs.
It will be a while before we see anything materialise but at least Microsoft have now publicly announced it.